
 This is my bike. It is a special bike. While the prominent feature is its useful carrying capacity (200lbs), there are lots of little, but important things that make my bike a commuting bike.
 FRONT LIGHT. If you're going to commute by bicycle you should be prepared to ride in low-light conditions. A good light helps you not only to be seen, but also to help you see. I have been very happy with my Blackburn Voyager 3.0. For $30 at your local bicycle shop, you get a lot of light for your money. The only downside is that the "blink" mode makes me nauseous and I only turn it on briefly to catch the attention of oncoming drivers in very dark conditions. Otherwise I leave it on the "steady" mode and I love how it lights up the roadway for me (for not very much money!). It also mounts easily and I carry extra AAA batteries in case it dies mid-ride.
UPDATE, April 25, 2009: The Blackburn Voyager 3.0 initially provides a lot of light, but it's a "battery eater!" I am currently using a PrinctonTec light that has 3 mount options: helmet, handlebars, headlamp. I am also eyeing a Cat Eye light that my friend has. Keep an eye on the "gear reviews" section for an updated light review!
 REAR LIGHT. Again, a commuter must be prepared for low-light conditions. Not only can a white front light and red rear light save your life, it's actually the law. I outfit my bike with two Planet Bike Blinky Super Flash rear lights which I love. They are the brightest red lights I've seen and come with an eye-catching crazy blinking option (bu-bu-BLINK!#BLINK!%, bu-bu-BLINK!#) as opposed to a rhythmic (blink. blink. blink.) that's easier to miss. They also mount really easily. It's not in this picture, but I've also added a safety triangle to the back of my bike which increases my visibility any time day or night. The reflective orange tape was also my addition and it is extremely reflective. I also used it on my Bikes at Work bicycle trailer. You can find some online at Identi-tape.
 PUMP. A hand pump is part of the complete flat kit. If you're going to commute by bicycle, you need to know to fix a flat tire. The things I carry to fix a flat are basically: something to get the tire off, something to patch a hole, a spare tube if that doesn't work out and air to pump it up. I also carry back-ups for some things (like 2 sources of air) in case one doesn't work out. More specifically, this is what I carry:
- Pump. I like my Wrench Force frame pump because it has a large shaft which makes pumping up your tire go faster (forget those tiny ones!). It also works on presta or shrader valves and fits nicely into my frame (which is amazing because my frame is SMALL!).
- 2 CO2 cartridges & an applicator. This is a fast, yet wasteful and risky way to pump a tire. I keep it as a backup or if I need to get back on my bike fast (rainstorm!).
- Tire levers. You only need 2 (or sometimes 1) to get a tire off, but it is best to carry 3 in case one breaks.
- A "old fashioned" glue patch kit and the "new school" stick-on patch kit. Either work. What can I say? I like back-ups.
- An extra tube in case your tire is not patchable or you're in a hurry (rainstorm!).
To learn HOW to fix a flat, I recommend asking someone to show you how. I've also posted this helpful video.
 MAP, ADDITIONAL VISIBILITY & RAIN GEAR. Having an Xtracycle sure is handy-- there are handy pockets for keeping handy things. I keep a bright yellow rain jacket (the sleeves zip off!), a safety triangle (I kept it in there for passengers but now it's just mounted on the back of my bike. I may purchase another.), a bright orange poncho I bought at the thriftstore for $1 (again, for passengers or perhaps to cover & protect a load) and a map of Walla Walla.
(NOT PICTURED): FENDERS. I take them off for the hot, dry summer months- but for the rest of the year, I keep my butt and feet dry by installing fenders! For complete protection, I recommend mud flaps to stay extra dry. I am also eyeing these rain chaps or this rain cape or this nifty rain cape and spats (scroll down) for the next wet season which I would then keep tucked away on my bike.
(NOT PICTURED): BUNGEES. I keep lots of bungees in different lengths to help strap on awkward loads.
 PEDALS. The folks down at Rivendell Bicycle Works are adamant that bike shoes & pedals really aren't necessary and don't actually help much (in non-racing use)-- though I do love using them on my racing bike. On my racing bike. Otherwise- these simple yet grippy platform pedals are wonderful for hopping on in whatever you're wearing.
 PEDALS. The folks down at Rivendell Bicycle Works are adamant that bike shoes & pedals really aren't necessary and don't actually help much (in non-racing use)-- though I do love using them on my racing bike. On my racing bike. Otherwise- these simple yet grippy platform pedals are wonderful for hopping on in whatever you're wearing.
(NOT PICTURED): KICKSTAND. Again, no one is racing, so there is no reason to "save weight" and neglect to install a kickstand! They are superbly handy when parking your bike and are of great assistance when trying to load your groceries!
 CARRYING CAPACITY. There are lots of ways to carry things on your bicycle. That's a whole post of its own, but to brief you.. a front basket, a rack and basket, a rack and panniers, a bicycle trailer, an Xtracycle, a bakfiet or cargo bike, or a very large bicycle trailer for those XXL loads (like your mattress and box spring). Also note the gray tape on my bags. I used strong fabric glue to adhere some reflective fabric tape to increase my side visibility. I bought the tape from Identi-tape.
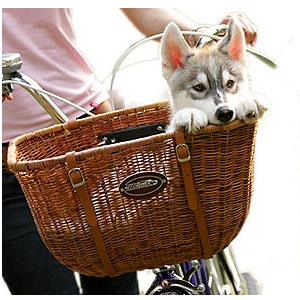
 PASSENGERS. Okay, so maybe not everybody's bike can do this- and you don't really need to just to commute.. but it sure is nice to be able to take passengers on your bicycle! Another solution for larger parties is just to bring along another bicycle (or two, or three!).
 CARRYING CAPACITY. There are lots of ways to carry things on your bicycle. That's a whole post of its own, but to brief you.. a front basket, a rack and basket, a rack and panniers, a bicycle trailer, an Xtracycle, a bakfiet or cargo bike, or a very large bicycle trailer for those XXL loads (like your mattress and box spring). Also note the gray tape on my bags. I used strong fabric glue to adhere some reflective fabric tape to increase my side visibility. I bought the tape from Identi-tape.
 PASSENGERS. Okay, so maybe not everybody's bike can do this- and you don't really need to just to commute.. but it sure is nice to be able to take passengers on your bicycle! Another solution for larger parties is just to bring along another bicycle (or two, or three!).
If you can think of any other 'essentials' to bicycle commuting or have questions about anything I've listed, please leave a comment!


